Anyone that's done any gardening at all knows how difficult it is to keep potted annuals and tender perennials through the winter. In the past, I've brought them inside and placed them in the corner of an infrequently used bedroom. If you've ever tried this, you know what a horrendous mess they make and by the time you can put them back outside, they're almost leafless and they're leggy - and just look sick. It's well into spring before they begin looking good again and you wonder why in the world you bothered.
Greenhouses are really nice for those gardeners who don't mind investing the time and work involved to keep it working optimally; but, I'm not one of those. Admittedly, in the spring sometimes I wish I had one to get new annuals started and to have a place to store tender perennials. But not enough to take the leap!
Then hubby inadvertently helped me develop an alternative for keeping the plants healthy as well as nice and warm over winter.
One fall day in 2006, we were sitting in our 'outside livingroom' sipping tea and enjoying the nice, crisp air. I was pondering how I could possibly keep these all these beautiful potted plants surrounding us looking good over winter. I verbalized this thought to hubby and he said, "Why don't you do what the old folks did?"
Of course I had no idea what he was talking about so he explained that when he was growing up, every woman had a 4-foot deep 'flower pit' where they'd store the plants overwinter - then they'd take them out in the spring. He said they didn't have the money to replace them every year and since it was as cold in the house as it was outside, this was the only option available.
The theory (it's not a theory - it's a fact) behind this is that a certain distance underground, the soil never gets below 55 degrees; therefore you don't have to worry about freezes and frosts. The top of the pit is covered with two doors - which protects the plants on freezing days/nights. On nice, sunny days, of which the south has plenty, the doors are opened to allow light in and also to allow an exchange of air. They're also opened during rains - providing it isn't a freezing rain.
This sounded fantastic to me and since he was so familiar with this pit, I thought it would be a good idea if he built me one ..hehe. . .he didn't think it was such a good idea if he built one, but he did go talk to a man who owns a backhoe and the man promised to come out the next day and dig the hole. Of course, he didn't show up, nor did he call, and I was getting antsy.
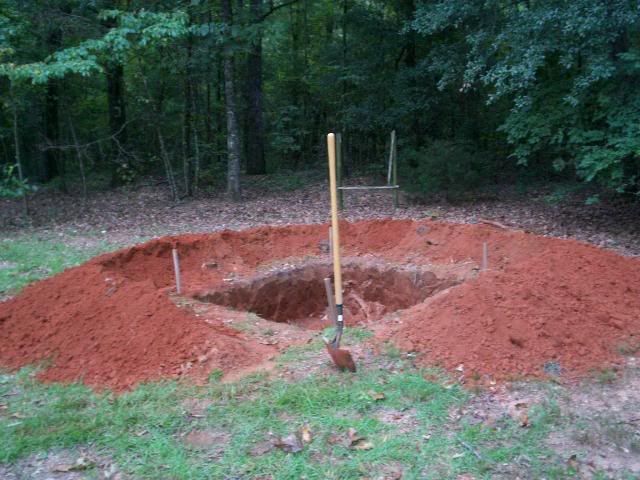
The following morning hubby got out with his shovel, rake and mattock along with a few measuring tools, stakes and boards - asked me where I wanted the pit, then he got started.
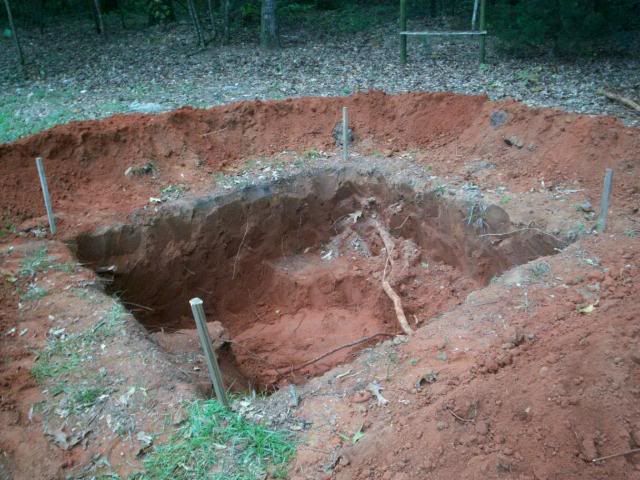
He piled the dirt from the hole around the edges of the pit. This allows a little more height for the pit, plus gives a nice landscape effect.
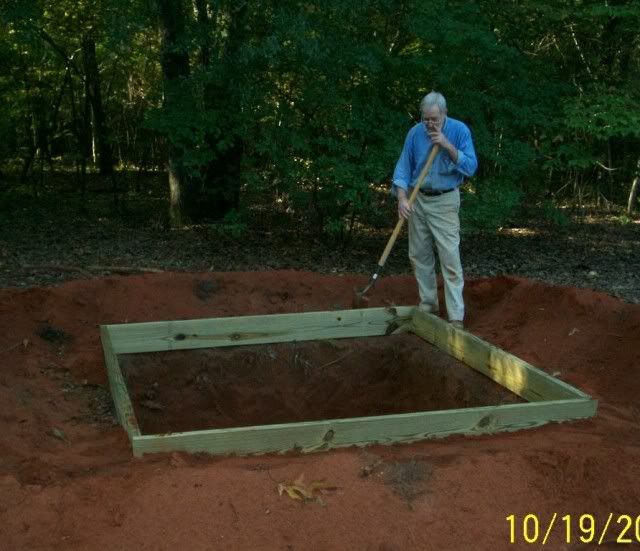
When he got the pit dug and the dirt piled around it like he wanted it (he's a perfectionist), he framed the top of it with treated lumber. This was to stabilize the dirt and keep it from falling back into the pit, plus provide a frame to support the doors.
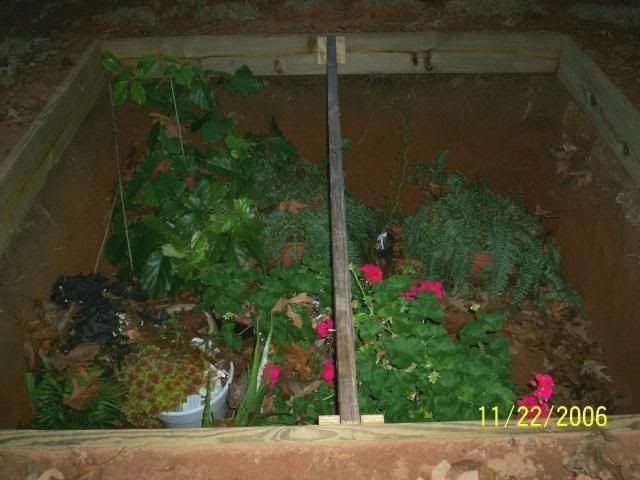
I only put a few plants in the pit the first year. I'll be quite honest with you and tell you I didn't really believe it would work .. .but also couldn't believe he'd go to this much effort without the confidence it would!
Well, this is how my annuals looked in November of 2006.
And this is how they looked in December.
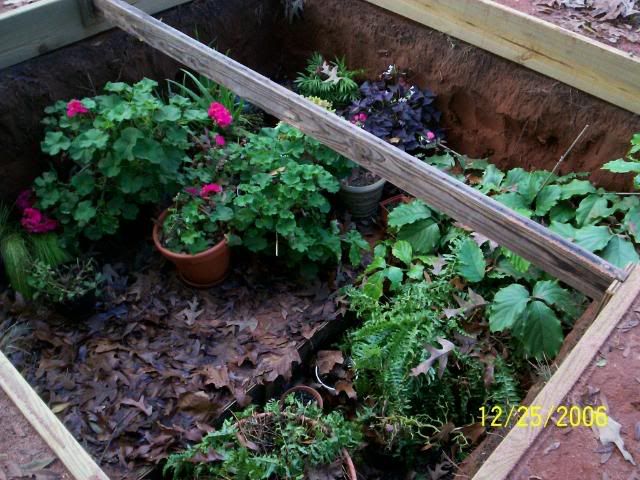
and then February
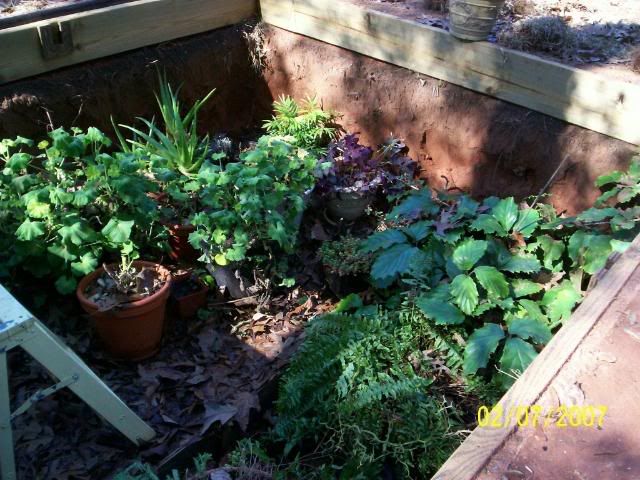
In March, I took the plants out and put them where I wanted them! They took off growing immediately and were bloomng much sooner than new plants would have. Of course, by this time "I'm a Believer." . . .Now if you recognize this song title and can sing the rest of it, I can just about guess your age!!!
So now I fill the pit with whatever I can find - and have even asked for another pit - but I don't think that's gonna happen! I even dig my Mandevilla, Bouganvillia, and Gerbers and put them in the pit for overwintering. These three particular plants are some of my favorites but because of their price, I hated buying them every year. Now I just dig them - place them in 5-gallon buckets, fill with potting soil (hubby drilled some drainage holes), then place them in the pit. Then spring, as soon as the soil is warm enough to plant them, they're ready to continue growing.
I know this method won't work for everyone . .restricted space. . uncooperative hubbies . .or various other reasons make it prohibitive, but it works SUPERBLY for me!


2 comments:
I just love your blog! I'm happy to feel as though I've met you through Patsy (I work with her). Keep up the GREAT tips!
Kathy Hurd
Thank you so much for you encouragment! Sometimes I wonder if anyone reads my posts . .
Yes, Kathy, I feel as if I know you too. Patsy is always referring to y'all's conversations.. all good of course.
Remember asking me about the Knockout Roses? Well, you planted a seed . . .and I rooted two reds and one yellow this year. Am watching and waiting to see if I might change my attitude on my feelings for them. So far this year, they've been superb - even in this drought! The red ones are about 5 feet high and at least that big in diameter.
If I don't make myself clear or if I raise other questions in your mind, don't hesitate to bring it to my attention, OK? I LOVE talking flowers, plants, or gardening!
Post a Comment