Welcome to My Little Corner of the World

Family, friends, and acquaintances are now free to stroll my gardens at their leisure. So grab a glass of sweet tea and sit a spell.

Questions, comments, and suggestions are appreciated and welcomed as you stroll through the gardens. Sure hope you enjoy your visit as much as I enjoy your company.

Sunday, October 30, 2011

Followup on Muhly Grass, aka Mark Grass

This is a followup on the Muhly Grass, aka Mark Grass post of 01-11-11.
Even with the heat and drought of the 2011 growing season, this plant has done superbly.

It is a happy-go-lucky plant that requires no care once it's establish in a sunny, well-drained area.

When it shows new growth in the spring, a dose of balanced fertilizer is ALL that's required from you. Mother nature does the rest.

No pests or diseases infiltrate this plant and wildlife doesn't like it at all! It's growth habit is clumpy.

New plants form around the perimeter of the clump and when folks want some, I just dig them one of the new plants; however, it's time to seriously divide mine, and I plan on planting them en masse throughout my gardens next spring. It's fabulous planted en masse on a hillside or knoll - but unfortunately, I have neither! It's hardy from zones 7 through 10. It makes a great xeriscape plant.

It will bloom like this from early October until frost - then all the fronds and blooms will turn brown. Even in this stage, it's gorgeous - it looks 'stately'. But before spring growth starts it should be cut back to about three inches. I use my hedge trimmers for this task and usually get it down with a couple of swipes. One year I failed to do this and found it impossible to get the dead fronds out of the new growth! So I just had to look at an ugly mess for one season. I try not to make the same mistake twice . . .so about February I get out there and get it done!

Three people have stopped this season to ask about my muhly grass. Now I know that three inquiries doesn't sound like a lot, but considering that we see only the postman and paper delivery person during a normal day, three is significant! (smiley face)

If you want to see some truly superb muhly grass follow this link: http://fairegarden.wordpress.com/2009/01/03/muhly-grass-see-you-in-september/

I almost didn't share this link with you simply because I'm jealous and intimidated - I'd sure like to where this person got their photography skills and what camera they use!!! Just kidding - but I am envious of their gardening and photography skills!

Thursday, October 27, 2011

Overwintering Potted Annuals and Tender Perennials

As promised in my last post, I'm gonna show you how I overwinter my potted annuals and tender perennials. Initially, this method took a lot of work, but has paid off handsomely over the years.

Anyone that's done any gardening at all knows how difficult it is to keep potted annuals and tender perennials through the winter. In the past, I've brought them inside and placed them in the corner of an infrequently used bedroom. If you've ever tried this, you know what a horrendous mess they make and by the time you can put them back outside, they're almost leafless and they're leggy - and just look sick. It's well into spring before they begin looking good again and you wonder why in the world you bothered.

Greenhouses are really nice for those gardeners who don't mind investing the time and work involved to keep it working optimally; but, I'm not one of those. Admittedly, in the spring sometimes I wish I had one to get new annuals started and to have a place to store tender perennials. But not enough to take the leap!

Then hubby inadvertently helped me develop an alternative for keeping the plants healthy as well as nice and warm over winter.

One fall day in 2006, we were sitting in our 'outside livingroom' sipping tea and enjoying the nice, crisp air. I was pondering how I could possibly keep these all these beautiful potted plants surrounding us looking good over winter. I verbalized this thought to hubby and he said, "Why don't you do what the old folks did?"

Of course I had no idea what he was talking about so he explained that when he was growing up, every woman had a 4-foot deep 'flower pit' where they'd store the plants overwinter - then they'd take them out in the spring. He said they didn't have the money to replace them every year and since it was as cold in the house as it was outside, this was the only option available.

The theory (it's not a theory - it's a fact) behind this is that a certain distance underground, the soil never gets below 55 degrees; therefore you don't have to worry about freezes and frosts. The top of the pit is covered with two doors - which protects the plants on freezing days/nights. On nice, sunny days, of which the south has plenty, the doors are opened to allow light in and also to allow an exchange of air. They're also opened during rains - providing it isn't a freezing rain.

This sounded fantastic to me and since he was so familiar with this pit, I thought it would be a good idea if he built me one ..hehe. . .he didn't think it was such a good idea if he built one, but he did go talk to a man who owns a backhoe and the man promised to come out the next day and dig the hole. Of course, he didn't show up, nor did he call, and I was getting antsy.

The following morning hubby got out with his shovel, rake and mattock along with a few measuring tools, stakes and boards  - asked me where I wanted the pit, then he got started.

He piled the dirt from the hole around the edges of the pit. This allows a little more height for the pit, plus gives a nice landscape effect.


When he got the pit dug and the dirt piled around it like he wanted it  (he's a perfectionist), he framed the top of it with treated lumber. This was to stabilize the dirt and keep it from falling back into the pit, plus provide a frame to support the doors.


I only put a few plants in the pit the first year. I'll be quite honest with you and tell you I didn't really believe it would work .. .but also couldn't believe he'd go to this much effort without the confidence it would!

Well, this is how my annuals looked in November of 2006.
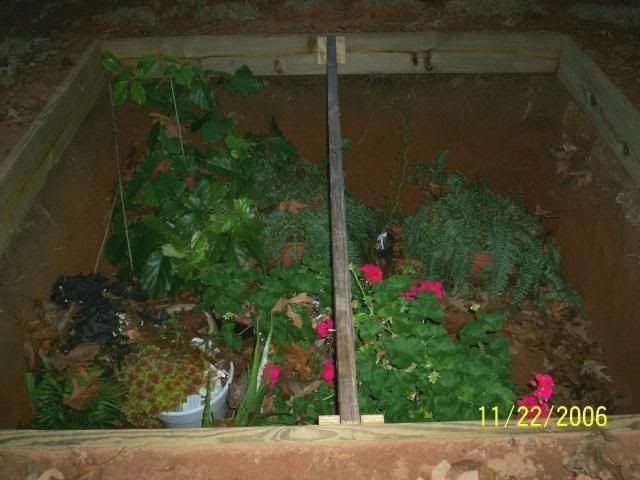
And this is how they looked in December.
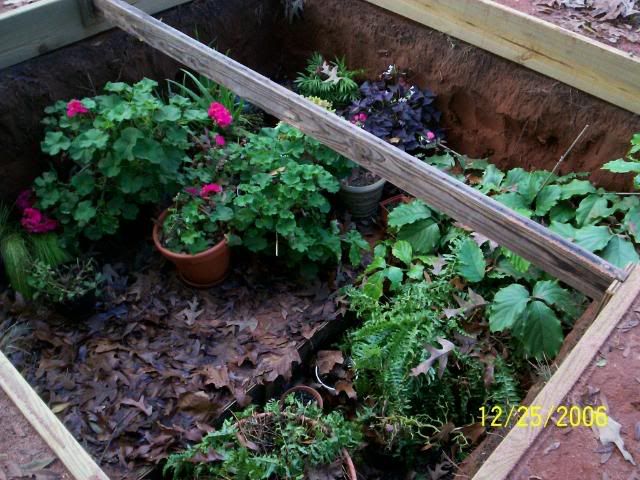

and then February
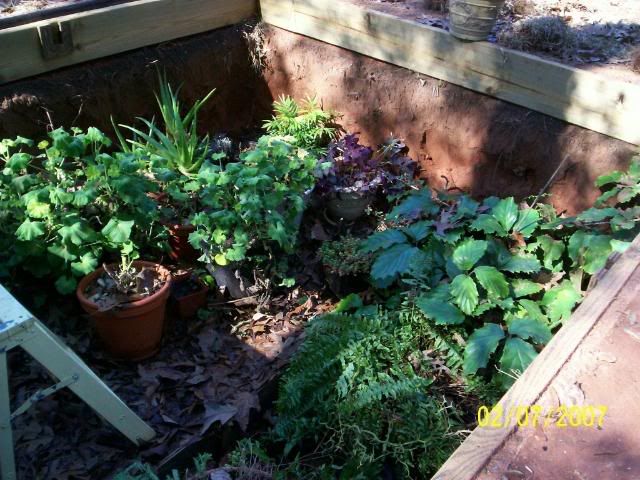

In March, I took the plants out and put them where I wanted them! They took off growing immediately and were bloomng much sooner than new plants would have. Of course, by this time "I'm a Believer." . . .Now if you recognize this song title and can sing the rest of it, I can just about guess your age!!!

So now I fill the pit with whatever I can find - and have even asked for another pit - but I don't think that's gonna happen! I even dig my Mandevilla, Bouganvillia, and Gerbers and put them in the pit for overwintering. These three particular plants are some of my favorites but because of their price, I hated buying them every year. Now I just dig them - place them in 5-gallon buckets, fill with potting soil (hubby drilled some drainage holes), then place them in the pit. Then spring, as soon as the soil is warm enough to plant them, they're ready to continue growing.

I know this method won't work for everyone . .restricted space. . uncooperative hubbies . .or various other reasons make it prohibitive, but it works SUPERBLY for me!

Wednesday, October 26, 2011

Cleome

One of my favorite sisters, Helen, got me hooked on the Cleome, sometimes called 'spider' flower. It is another annual that I use as a filler.

The yellow flowers in bloom here are lilies. Ignore them for now and we'll talk more about them in the spring.

Cleome bloom on the top of tall spikes from the bottom upwards. The bottoms begin to set seed prior to the top of the stem blooming. Between this and the fact that the stamens are long and wiry, it gets the name "spider flower'.

It's a good plant that loves full sun. It is somewhat drought tolerant, but will do much, much better if it's watered during dry spells. The entire bloom is ball-shaped with individual small blooms forming the ball. Technically, this characteristic is called 'racemes'. These balls, or racemes, are sometimes six inches in diameter and you'll have many on one plant.

Because of their height, they make a fantastic back of the border plant. I like to plant them in front of the sunflowers . . .the two together makes a beautiful sight! The leaves will begin to turn brown and the stems will get leggy toward the end of summer, but since they're used at the back of the border, these drawbacks are barely noticeable. Some gardeners say they grow these plants up to six feet tall; however, about four feet is as high as I've ever gotten them.

I find the leaf of the cleome almost as interesting as the flower. Atop a long, spiky petiole the six-petaled bracts fill in the plants. The inside bracts are very small with each succeeding bract getting larger. Of course the top bract is the largest. This arrangement of leaves plus the quantity of bracts keep the cleome looking full until mid-fall.

Because of their musky odor, Cleome is not recommended for cut flowers in closed areas . But they work great on a porch or patio. Soak the stems in warm water to condition them prior to making your arrangement - and enjoy!

Insects and disease are not a problem with this plant.


Cleome Seed Pods

Even though they reseed prolifically, it's advisable to start with new plants each year. Most of the cleomes today are hybrids and the new plants won't be true to the parent plant. I've never tried to root these stems . . .but I don't see any reason why you couldn't. And since they are pricey (considering they're annuals), you might want to give stem rooting a try. They cost from $5 to $8 a PLANT, depending on whether you buy them from the big box stores or an independent nursery.

In my next post, I'll show you how I keep tender annuals and perennials over winter. My method is not one that everyone can use, but it works great for me!

Monday, October 24, 2011

Penstemon


The Penstemon (pen-STAY-mon) is a herbaceous, evergreen plant. It blooms in early summer and when it's in bloom, you really don't notice anything else in your garden. It's stately stems rise from three to four feet tall and produces long, tubular-shaped, five-petaled flowers. It starts blooming from the bottom of the stem upward. The blooms on the bottom of the stem maintains it's color until blooming is complete. It's in full bloom for six to eight weeks. Deadheading will increase the bloom period a while longer.

The Penstemon is a fantastic xeriscaping plant and is grown throughout North America. It's grown profusely in Arizona where you know they don't even know what rain is . ..as you've probably figured, they don't like soggy soils.

Native Americans chewed on the roots of this plant to relieve toothache.

Penstemon is available in red, pink, lavender or white. In 1999, the variety Husker Red, which is what I have,  was named the Perennial Plant of the Year by the Perennial Plant Association.

The foliage of this plant hugs the ground. Never getting more than two to three inches tall. This makes it a fantastic ground cover during the winter.
It multiplies rapidly with pups originating from the mother plant. I started with three plants. After about two years I began giving them to friends and relatives. Now they are tossed into the woods if I can't find good home for them.

Rabbits deplore this plant but hummers and bees LOVE it.

Saturday, October 22, 2011

Bananas, Coffee Grounds, and Epsom Salts

Most of you know that chemicals are kept to a minimum in my yard .. simply because I feel mother nature is a much more effective nurturer than I! Not to mention that unnecessary chemicals leaching into the soil then ultimately, the ground water, is a negative as far as I'm concerned. If you're interested in organic gardening, here are some tips you might appreciate.

Do you have some overripe bananas and don't have time to make banana bread? Here's your solution. Rather than toss them in the trash or on the compost pile, mash them up and 'plant' them around your roses! There have been times when I'd even buy overripe bananas that have been marked down just to feed my roses.

And since hubby no longer can have potassium nor carbs; no longer can I make banana bread. waaawaaa!!!! My self-control is not all that great when it comes to good food; therefore, should I break down and make the bread, I KNOW who'd eat it . .then we'd have to install double doors all over the house - and since I'd rather spend those $$$$ on plants and shrubs, I just let the roses have the overripe bananas instead!

Roses LOVE the potassium that the bananas and their peels provide! And if you want to provide a really good meal for the roses, mix some used coffee grounds into the bananas. . .you'll make your roses very, very happy. And if you really want to pamper those roses, add about two teaspoons of Epsom Salts into the mixture. ALL flowers and blooming shrubs love the magnesium that the salts provide.

Used, dried coffee grounds are great for many of your plants and shrubs. I use mine mostly on the hydrangeas that flank my back door steps. The coffee grounds supply a constant source of much needed nutrients. Simply let the grounds dry (sometimes I use the microwave for this) and sprinkle them around your shrubs . .mother nature will take them down into the soil. While the grounds are providing nutrients for you prized hydrangea, the grounds will keep the soil soft and pliable which allows for nutrients and moisture to be absorbed more readily.

Nikki Hydrangea (Margo)

Oak Leaf Hydrangea

Many experts advise against this practice, but many more approve of as well as recommend it. As long I have have hydrangeas like this, I'll continue the practice!

One more thing - If you drink your coffee black, dump your cold coffee into your African violets rather than the sink. They'll LOVE you!

Thursday, October 20, 2011

Hellebore


The Hellebore is better known as the Christmas Rose and the Lenten Rose. This is because some varieties bloom during Christmas time and others begin around Lenten season (40 days prior to Easter).

This is a very low growing evergreen perennial that's gorgeous the entire year. It's low maintenance and very easy to take care for. Just put her in the shade, be sure she gets plenty of water (not soggy - just moist) and fertilizer. Sometime in September I give them about a cup of bone meal sprinkled around the plants an worked into the soil. Then just wait for her gorgeous bloom.

The most unique thing I love about this plant is its individuality. I have many varieties; therefore I have blooms from Christmas to late spring; when most other plants are dormant. I haven't tried any for arrangements- but I think I might this upcoming season.

The colors range from pure white to almost black. The only color I don't have is the true red. Needless to say, the red is on my wish list! Its leaves are atop an 18" stem that originates from the soil rather than on the plant.  It's a five-section, serrated, leathery leaf.

The only drawback I've seen is the head of the bloom droops (another thing most retailers won't tell you). Some botanist say this is because if water get down into the bloom and freezes, and creates an ugly mess.You literally have to lift the head of the flower up to view it. But, hybridizers who recognize the value and joy of this plant are working judiciously to develop a Hellebore whose flowers will bloom upright.

Propagation is accomplished by either division or seed. But remember that, because it's hybridized, seed won't necessarily be true to the parent plant.

Mine are planted in my 'fern' bed along with Heucheru and other shade plants that love moisture.

One of my favorite nieces that accompanied The Sisters on a recent trip to Callaway Gardens saw and fell in love with this plant. Callaway had it naturalized throughout the woods and that was a gorgeous effect as well.

Monday, October 17, 2011

A Question for You!

This white jewel was found growing amongst my cannas this past summer. I have no idea what it is nor how it got there (but I sure hope it multiplies). It bloomed around late June.

The fronds were sorta like the amaryllis plant - the petals had about five 'spoke' looking thingies extending from the petals - The fronds were about two feet high and the bloom stood about three feet - the round part of the bloom was about three inches in diameter and the 'spokes' were at six to eight inches long. Other than this oral description and the photo I can't tell you anything else about it!

Any help would be appreciated - as I'd like to have more of these babies.

I'm definitely gonna watch it closer in 2012 and mark its location!

Sunday, October 16, 2011

Lavender

This plant and its fragrance stirs up all kinds of emotions in my pea brain. When I think 'lavender', I also think peace, contentment, and romance.

This is a Mona lavender (Plectranthus). It is a tender perennial - which means it needs protection in the winter. It was hybridized in Australia in 1999 and is just now receiving the praise it so richly deserves.

While all lavenders produce well under reasonable conditions, this one seems to do extremely well. This particular plant is about three years old and I've never seen any disease or pest on it.

Good soil and moisture are requirements for this lavender. About once a month (during the growing season) she's fed with Miracle Grow with a little Epsom Salts in the mixture. In case you don't know, the magnesium in Epsom Salts encourages new blooms.
This is a closeup of its dainty, trumpet-shaped blossoms. But its leaves are as interesting as the blooms. They are serrated and a beautiful shade of green. The underside of the leaves are a deep purple color with even deeper purple colored veins. When the wind is blowing . .the show is unmatched.

It roots very easily and in the spring time, I'll root a few cuttings to put in my shade garden. These will get three feet high by summer. Sometimes I'll dig them out in the fall and pot them . .but mostly, I let nature have its way.

Unlike most lavender, Mona cannot take full sun; but she does well in dappled shade. Pinching the stems while they are young ensures a bushy plant.

The lavender below is hardy and is very, very prolific. I bought this one about four years ago and had to divide it this fall. It had produced (wherever the limbs touch the soil, it roots) enough plants to make a hedge about 10 feet long, plus some to put in containers. The instructions for caring for this lavender are not the same as the Mona. This one likes full sun with very little water and fertilizer. Its only requirement is pruning. Unless its pruned to allow some sun to the center of the plant, it begins to die in the center (I learned this the hard way). Since I normally have my pruners in my hip pocket, I just reach down and remove some of the tallest stems; this allows light back into the middle and regrowth starts immediately. I've never seen any disease or pest on this lavender either.

This is one of the pots in which I placed some of the 'leftovers' from my hedge (another pot flanks the entry to my garden). They look a little close but I'd prefer to thin them out each year rather than wait several seasons for the plant to fill the pot! The pink fronds behind the pot is Muhley Grass, which I'll cover in a later post. It's just now beginning to bloom good and hasn't quite reached its peak.

Friday, October 14, 2011

Gaillardia Daisy - Aristata

The Gaillardia, sometimes referred to as 'blanket flower', is a mainstay for most any garden. It is an herbaceous perennial that reseeds prolifically but is not invasive. Its hardiness zones are 3 to 10.


Its bloom is a brilliant red daisy-like form and is tinged with yellow at the edge of each bloom. The plant grows from two to three feet tall and is as wide as it is tall; therefore it makes a good middle of the bed planting. It's growth is bushy but if denied full sun, it will get leggy and sprawl. It's a great eye-catching filler plant. It can also be used as an accent plant.

Plumbago, coreopsis and yarrow makes good companion plantings for the Gaillardia.

The Gaillardia makes a fantastic cut flower and can last up to two weeks in an arrangement. A positive here is that the more you cut, the more it blooms.

Minimal water and fertilizer keeps the plant in continuous bloom from early spring until frost. Its only requirement is full sun. It is totally disease and pest free.

One package of these seed was purchased several years ago and since then, I have shared plants with almost all of my gardening friends - while keeping plenty for myself.

Tuesday, October 11, 2011

Mexican Cigar Bush - Cuphea ignea

The Mexican cigar bush is a 'must have' for those gardeners in to xeriscaping and for those who love easy care, showy, colorful,  beautiful, drought tolerant, hummer and bee loving  plants . .in other words, this plant is for you! It's hardy from Zone 5 through 10 and puts on its show from late spring until frost.

As the name implies, it is from Mexico.  Cuphea is derived from the Greek word kyphos, meaning bent, curved, or humped. Ignea means fire. It is sometimes referred to a firecracker plant. It is a hardy, woody perennial.

This plant reaches approximately four feet high and four to five feet wide. The orange flowers with their yellow tips bloom from the ground level and up the entire stem. It is NEVER without color and requires no deadheading; however, unless it's pinched when it emerges in the spring, it will look a little leggy before summer's over.

Two pinchings a spring should suffice . .one when it's about four inches high and another when those are about eight inches high. This allows the stems to develop enough fullness to prevent them from getting leggy during the summer.

It's such an easy care plant, that I forget it's there until I see the hummers congregating or the bright orange color catches my eye. Mine are at least 12 years old and the only insect I've seen on it is the praying mantis (which is one of the good bugs) and absolutely no diseases.

It's easy to divide as well . .. when I have a gardening friend wanting some, I just wait until it begins to emerge in the spring .. place a shovel where I want to divide it . .push it in then break a piece from the mother plant. It also transplants easily.

It's also great for the nature photographer. You'll almost always see hummers flitting around it, especially around dawn or sunset.

This is three plants


A closer view


Zinnia - Another Annual

The zinnia has been a mainstay in the cutting garden or as an accent plant for generations. And it's easy to understand why. The more you cut for arrangements, the more blooms you have. You all are probably very familiar with the zinnia so I'm not gonna say much about its growing habit, diseases, insects . . .but I did want to share a couple of special ones with you.

Last spring I purchased about eight red tall zinnias to put in the middle of a bed and got about 12 dwarf yellow ones with which to border the bed. Just a few weeks into the drought, the red ones looked soooooo bad, I just pulled them out! But the yellow dwarf ones looked superb - so I left them.

They all have withstood the drought with no problem at all! I purchased them at a local nursery and have absolutely NO idea as to the name of them! Usually, I hang on to tags until I decided if I like the plant or not, but for some reason, I did not in this case!

It is a daisy-like single flower and it's growth habit is mounded. The blooms keep their brilliant yellow color for weeks and it requires very little deadheading! It hasn't been bothered by any insects and it doesn't get the brown/black looking junk on them like the regular zinnia .. and it never gets leggy as some of the older zinnias.

In early spring of 2012, I'll be back at that particular nursery with hopes that they'll have more. If they do, I'll buy a couple of trays (and hang on to the labels) for fillers in different beds . .if they don't, I'll keep searching until I find some; and when I do, I'll post the name of them. However, if anyone knows the name of the zinnia, please leave a comment so that we'll ALL know!

This past spring, Patsy sent me a ton of zinnia seed that she had harvested from her 2010 gardens and I broadcast them over a particular area. I got really good germination but for some reason I forgot to pinch them to make them bush; therefore the plants are tall (about 4.5') and leggy. But I still managed to get some really good blooms off them.

They were mostly reds and purples and here are some of the blooms they produced.
Thank you, Patsy, you made me smile during the drought! And I'll be more diligent with my pinching on next year's plants.

Sunday, October 9, 2011

Positive Signs that Fall is Near

In my stroll yesterday, I examined my favorite Dogwood tree and noticed that it is loaded with red berries . .which denotes that fall is just around the corner!


It's my favorite dogwood because many years ago, as hubby and I were preparing to built our home we scoped the property to determine exactly where we wanted the house.

I spotted this tree and was overwhelmed at its beauty and said, "I want the house right here and I want to see this tree from my dining room window."

When the land clearning staff came to survey the area to determine how much work was involved in clearing other trees and underbrush, they were told that this tree had to be saved at all cost. They did a stupendous job and when they left, the only tree standing was my dogwood - and it wasn't damaged.

Since dogwood is an understory (understory means that it does best under a canopy of bigger trees) it did go through a couple of years in shock; but eventually recovered.

I just sit in my dining room . .enjoy my favorite dogwood and know that birds have a good place to live and raise their young in the spring and in the fall, they have all these delicious and nutrious berries on which to feed and build energy for the long trek south.

Now if winter will just get here so that I can sit in my recliner, sip hot chocolate, browse flower catalogs and read good books . . ..
then before I know it, spring will be here and I can go back to the dining room and enjoy the fabulous white blooms .. .


Train Up a Shrub the Way it Should Grow

Since this is a pretty long and detailed post I'll warn you that If you're not interested in planting or transplanting shrubs, you may get bored.  So read no further. If you are interested, read on.

Ahhhhhhhhhhh . .. fall is here!!! And fall is the best time to plant or transplant shrubs. Fall planting and transplanting is preferable for a couple of reasons.  The days are short and cool and the plants won't have to struggle to survive. Also, fall planting gives the shrubs a few weeks to get their roots established in their new home before they go dormant. Then they get blessed with all those fantastic spring rains. All this plus good planting practices almost guarantees success.

The first step in ensuring success is to select a healthy shrub. The top (green part) of the shrub denotes pretty much what kind of root system it has. If the shrub is bushy, thick, and green, most likely the roots are healthy as well. You can always double check by tapping the shrub from its container and inspecting the roots. If they are plentiful and white, chances are you have a good shrub. (If I see a plant with an unusual amount of roots growing out of the bottom of the container, I'll pass it by.)

When you get the plant home, submerge it (container and all) into a bucket of water for a couple hours. This ensures that the roots and stems are well hydrated before planting. Then take the plant (in the container) and set it in the area where you intend to plant. Let it remain there undisturbed for 2 or 3 days. This is to ensure that the shrub begins to get acclimated to its new home.

Last Wednesday I bought two Yule Tide Sasanqua. (After I describe the plant, and I'm gonna walk you through how to plant.) The sasanqua is a cousin to the camellia but there are differences that need to be considered as to where to locate them. The sasanqua doesn't like as much shade as the camellia.. .they like their home where they can get early morning sun and dappled shade during the day. They do not get as big; therefore do not require as much space as the camellia. The Yule Tide is a gorgeous bright red color and sometimes they'll bloom early enough to use in your Christmas decorations.

The sasanqua starts blooming in late December and blooms sometimes through April . .depending on soil, age of shrub, and weather conditions. The blooms are about 3" in diameter with bright yellow stamens. Bloom colors range from pure white, pinks, through bright reds. It is an evergreen shrub so you're never without some kind of color in the garden. Also, they make a better cut flower than the camellia. You know how easily the flower drops from the camellia stem? This doesn't happen with the sasanqua.  The leaves look much like the camellia.


Staging the planting area with the required materials and tools is important, as you don't want to get started then have to look for items you'll need. I normally get the wheelbarrow, shovel,  pruners, hose, mattock, (in case I hit some stubborn roots), fertilizer, compost, and a large piece plastic on which to place the soil you dig out.

After you've done all the soaking, acclimating, and staging it's time to dig the hole. It's best to dig the hole at least two times wider and deeper than the root ball. This is a case where bigger is better! When this hole is dug, fill it with water. . .throw in about 1/2 cup of balanced fertilizer (for the roots to 'reach' for) and let it drain (this soaks the ambient soil). Wait six months or so before giving them any more fertilizer; the nurseryman has already provided the plant with plenty of nutrients.

In equal amounts, mix compost and cow manure, with some of the soil from the hole. Build sort of a mound at the bottom of the hole. Build this mound high enough that the plant will be at the recommended planting depth.

Then taking the plant from its container, use your fingers, to remove most of the soil from the root ball. Then straighten any roots that are growing around the inside of the container. This is a critical step in that roots are like water; they'll take the path of least resistance. If they've already started growing around inside the pot, they will continue growing in that manner in the ground; i.e., never reaching out for water/nutrients and eventually the plant with either choke or starve to death. But if you'll take the time to straighten the roots and lay them straight outward on the mound you built, they start (and continue) reaching downwards and outwards as nature designed.

After you're satisfied that it is at the correct planting depth (plant transplanted shrubs at the level in their previous home), throw in some of the soil mixture then add enough water to settle the soil. This ensures that air pockets are removed . .. add more of the mixture ..water a little more (tamping a little after each addition) until you are at the top of hole. Gently walk along the perimeter of the plant to ensure the roots are in good contact with the soil. After doing this, you may have to topdress with a little more of the mixture. Check to see if you broke any limbs . .if so, cut them off as this jagged wound is an open invitation for insect/disease entry.

From this point, all you have to do is say a little prayer and get ready to clean up and mulch! Then wait to see new growth early next spring at which time you'll want to fertilize again with a good azalea fertilizer.

Patsy, you may want Ron to read this prior to new plantings at your new home . . .

Friday, October 7, 2011

Angel Trumpet - Brugmansia

The Angel Trumpet has proved to be a very reliable perennial in my garden. It usually grows to a height of  about six feet - This year, due to the drought I'm sure, it only got to about five feet.

It is of the nightshade family and all parts of the plant are poison if ingested. Many people don't like to use it because of their pets and possibly children becoming poisoned. However, I've never seen my dogs trying to eat it and the children that are in my gardens are supervised.


Due to its height it really needs to be at the back of the garden. You'd think with stalks this high it would require staking, but it does not. The stalks are firm and sturdy.
 
The plant is upright with several stalks with huge leaves from the bottom upward. The flowers are pendelum shaped and it usually starts blooming in July and keeps blooming until the days get really cool and short providing it's deadhaded regularly; however, this year mine didn't bloom until late September. Again, I blame the drought.
It's really easy to propagate. You can put a stem in water and in a short period of time roots will form and soon it'll be ready to plant in the ground.

Or you can do as I do ..dig a shallow trench next to the plant . .lay a stem (with the leaves broken off) in the trench and water well. Lay a brick or some other heavy item over it and next spring you'll have a new plant ready to either leave in place or move to another area.


When the frost kills the stalks back, I simply cut it to the ground and wait for next years growth!

Thursday, October 6, 2011

Another Annual

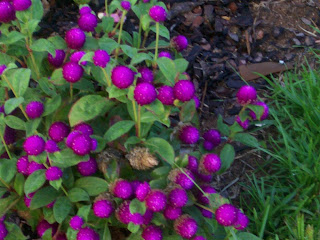
The Amaranth is another good annual. It is also known as 'Globe Thistle". It has been grown for eons and the Aztecs used certain varieties for grain. You can still get Amaranth in health food stores.

It comes in a variety of colors ranging from white to pinks and lavenders to deep purple. I use only the purple for the same reason that I use on pink vinca . .I don't want uncomplementary color schemes. Each plant produces up to 60,000 seed. You can see why some parts of the world consider it a weed . . .but here in the southeastern United States, it is anything but a weed.

Amaranth makes a tremendous border or filler. I've never tried it in a container but I see no reason why it wouldn't work there especially as an accent. Again, its only requirement is full sun. It is drought tolerant . .but likes a good watering if things get too dry. Disease and insects don't attack this plant either! Deadheading is not required, but it blooms more prolifically if you keep the dead heads off on a fairly regular basis. Like the vinca that I spoke of in an earlier, it reseeds great. Toward the end of the growing season I'll let some seeds develop so that I'll have plenty of plants the next year.

The plant itself gets about 12" high and its growing habit is mounded. It is literally covered with these gorgeous purple, rounded (globe-shaped) blooms sitting high above the plant. And if you're interested in dried flowers, it's great for that as well.

At the beginniing of spring when it starts spouting I move the little plants to various locations where I need their color . .or sometimes I just thin the plants and let them grow in the same area for a couple of years (all plants do better if rotated periodically). They need to be spaced 8 to 10 inches apart for the best effect.

One package of seed purchased years ago has continuusly graced my summer gardens and satisfied my border/accent requirements.

Monday, October 3, 2011

Annual Vinca

I guess you've noticed that I don't post a lot on annuals. That's because I don't use very many annuals.

But any good gardener does need some for fillers here and there. Therefore, over the next few days I'll share my thoughts/feelings on some of my favorites.

The annual vinca is probably my MOST favorite. It's the most reliable annual I've dealt with. It is not at all particular about soil or moisture. Its only demand is FULL sun.

I bought a package of the seed about twelve years ago and haven't been without the vinca yet. It reseeds very, very good and as soon as spring arrives it starts sprouting.
I move the little plants to wherever I happen to need them for that particular year. It grows in Zones 2 through 11. It grows anywhere from 6 to 16" high and about 12 inches wide. It branches profusely and the plants is almost always covered with these pink blooms. It's one of the few annuals that branches without pinching and it blooms continuously without deadheading. No disease and no insects bothers this plant and the deer doesn't like it! Who could ask for more?

Its colors range from snow white to deep purples and even red. I stay with the pink because I'm afraid the colors will get mixed. And since you can't determine the color until it blooms, I don't want to get them mixed up and have an "unwanted color combo" going on!

This photo is of an individual plant.

I've used it as a filler, a border, and as a container plant. It makes a gorgeous show however you choose to use it.

Then when frost hits it . .all you do is pull it out of the ground and wait for next year's sprouting!

Plumbago (Auriculata)

The Plumbago is my newest love. I've looked at it for years and years but it looked so delicate, I wasn't sure I could (would) take care of it.
But after reading as much as I could about it, I purchase two this past spring. After the drought began I had absolutely no hope they would survive.
One has always look healthier than the other and since the temps have cooled to the mid-80's during the day and around 60 at night, I think they'll both survive. Right now they're super small; no more than 18" tall and about 12" wide, but will ultimately reach a height of four feet and a width of five feet! Can you just imagine these plants that big with these gorgeous flowers on them????

This is a scrambling bush that propagates by new suckers. You can also start it from seed or stem cuttings.

Not only is this shrub drought tolerant its disease and pest free. They'll grow in full sun or partial shade. Now I'm wondering why I even thought I couldn't care for this baby!!!!
 
Deadheading keeps the shrub in full bloom. It is recommended that you prune this bush about every three years or so to maintain its shape and keep it within its boundaries.
 
It is recommended as a container plant where its limbs with the beautiful blue flowers drape the sides of the container; as an accent plant; as well as a hedge . .man, I do see a hedge forming in my mind?

Birds love it because they can hide in its thickness and the butterflies also love it. Wildlife, including deer, does not like it so you won't be bothered with them eating your shrubs!

Fertilize about every three weeks with a soluble fertilizer and always water this shrub at ground level . .I use a soaker hose for mine. Its hardy from zones 8 through 11. I think that for their first winter, when a freeze is predicted I'll put 5-gallon buckets over them, as a safety measure.

This photo was copied from the web.
 There is also a white form which is very attractive. The white flowers is a wonderful addition to the night garden as they appear to glow at twillight.

 I planted my blue ones in an area where they get mostly sun, but by three in the afternoon, they're completely shaded by my beloved live oak which another story unto itself. I'll cover the live oak in another post.